
Cheesecake Pops and a baby shower
3:45 PMWhat a week! It's been absolutely crazy... which is why I haven't posted anything for an entire week. So sorry. :) On Saturday we had a baby shower for one of my sisters-in-law. In preparation for it, I spent the entire week before-hand working with my other sister-in-law (I have two living in the area) making the decorations. I have to say, it was absolutely adorable!!
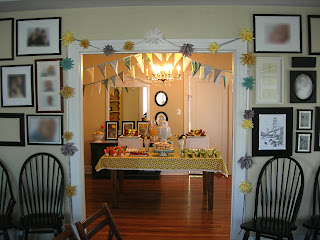
We made these awesome little fabric flowers, attached them to ribbon, and hung them over the doorway. I am completely in love with them and they are so easy and versatile!!
(I'll be posting a tutorial soon.)

For a baby boy, we went with a sort-of "up-scale" circus theme with a grey, yellow and blue color scheme. We made this awesome bunting/banner/garland (whatever you want to call it) from fabric remnants. These are super easy to make as well! So easy, in fact, that I'm probably going to make a lot more... for every holiday I can think of! :)

For the food, we had an array of healthy and, um, not-so-healthy food.
(Click on the image for more detail and to read the list of foods if it's too small.)
My time and energy went into making the Cheesecake Pops. I have to say, these were really fun and not nearly as difficult as they look. Unfortunately I wasn't thinking when I made them, so I don't have any step-by-step photos.
While I typically make everything from scratch (it's more economical, healthier, and tastes way better), I do appreciate some of the pre-made/packaged things you can buy. Since I was making lots of these little guys and busy with other things to boot, I decided to make these as easy as possible. (You'll thank me later).
Cheesecake Pops

Step 1 - I made a Jello No-Bake Cheesecake and put it in the fridge to let it set. Talk about easy - 5 minutes and I was done! (I actually doubled mine and made it in a 9x13 casserole dish and put the crust in between two layers of cheesecake filling.)
Step 2 - I cut the cheesecake into 1 - 1 1/2 inch squares and, with wet hands, rolled them into balls. Wetting your hands before rolling each ball is important so that it sticks to itself rather than all over your hands.
Now, to me, the very best part of a cheesecake is the last bite with lots of graham cracker crust goodness. That being the case, I made sure there was crust in each of my Cheesecake Pops.
Step 3 - Put the cheesecake balls onto a cookie sheet, put a lollipop stick into each ball, and put them in the freezer.
Step 4 - Prep bowls of toppings to dip the chocolate covered cheesecake into. I used two different colors of sprinkles, chopped nuts, and chopped up dried cherries. (The cherries were my favorite).
Step 5 - In a double boiler or bowl set over a pot of boiling water, melt the chocolate. I used dark chocolate as well as white chocolate so that I could color it to match the decor.
Step 6 - Working quickly to keep the cheesecake frozen, dip the balls into the chocolate, then into the toppings. Set aside to dry. Keep chilled until serving. I found that if the cheesecake balls started to thaw at all, they just fell off the sticks and made a big mess. I ended up just taking them out of the freezer one at a time.
To keep the pops from getting a flat edge while they are drying, push the stick into something sturdy to hold them up. I used a pot full of dry beans. Be creative - there are all sorts of great solutions laying around your house!


![Facebook_F[1]](http://farm8.staticflickr.com/7175/6426658719_cd31bb8b47_s.jpg)


0 comments