
Kitchen Remodel (phase 1): Ardex Countertops - "faux-crete" - over Tile
5:00 AM
Disclaimer: This post is LONG! Before I started this project, I read everything I could get my hands on, and still had questions. I tried to address those here. If you just want to see the finished pictures, scroll to the end!
I hope everyone had a wonderful holiday season. I took a little break for Christmas, that turned into a longer break when everyone got sick, and then I had the brilliant (though my husband might say crazy) idea that we needed to resurface our kitchen counters NOW! So we dove in and completed Phase 1 of our kitchen remodel (backsplash tiles and painted cabinets next)! And now, March is almost done and I'm finally getting back to blogging...
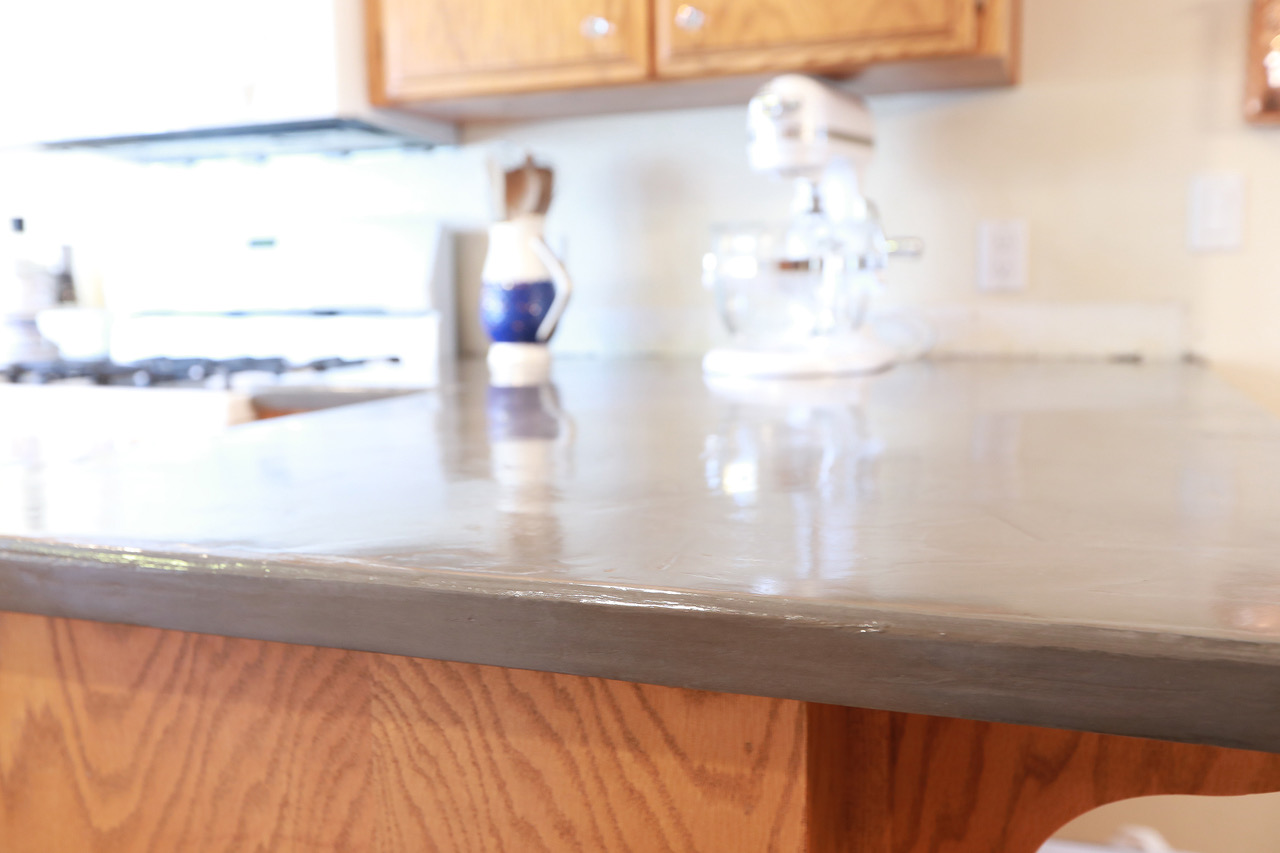
Kitchen - After (still a work in progress though!)

Kitchen - Before

When we moved into our house, I decided that the blue tile counters in our kitchen and dining room buffet needed to go. It was the first thing on my (ridiculously long) list of projects for the house. I am absolutely in love with soapstone countertops and desperately want them for my kitchen. However, they aren't cheap, and re-doing the kitchen wasn't really in our budget. I figured I'd just make do and save up for my dream counters. Then I hosted Thanksgiving dinner and immediately following that I started baking like a mad-woman for my 2016 edition of 12 Days of Cookies. Lets just say I'd had more than enough of rolling dough on a little board, and trying to keep the tile and *deep* grout lines clean.
I had done some research on other counter options and was thoroughly intrigued by the idea of doing a concrete skim coat over my existing tile. Apparently this was a super popular thing a couple years ago and everyone was covering up ugly Formica countertops, or building them out of plywood and skim coating them. What I couldn't find was a tutorial for doing it over tile. It made me a little nervous to try it, but I figured anything is better than what we had, so why not try. (And for under $300 for new countertops, who could say no?)
What you Need
Ardex Feather Finish - You can look for a local distributor or just buy it on Amazon. Because I was doing this over tile, I ended up using more than I thought I would (more than other bloggers said they used). I ordered 4 10-lb bags just to be safe and ended up using all but a few cups in the bottom of one bag.Sealers - After reading enough blogs and tutorials and comments on these to make my head swim, I decided to go with GST International Satin Seal and Final Coat. Short of actually using an epoxy, this seems to be the most all-around reliable and heavy duty. I also love that I don't have to wax it every 3 months or so (Because I know that wouldn't realistically happen!).
Color - If you decided to change the color of your concrete. I used Sakrete Cement Color in charcoal.**
Mixing buckets - I stopped by our local Walmart bakery and asked for their empty icing buckets. Sometimes they're just glad to get them off their hands, but they usually cost $1.00. They're great buckets for all kinds of projects, so I usually keep some on hand.
Measuring cups - I used a set of measuring cups and spoons from the dollar store to measure out the right ratio of Ardex, cement color, and water, that way my different sized countertops are all the same color.
Sandpaper - We used 40 grit on the tile to rough it up before applying the Ardex. We followed that with a little grout saw that we used to put some pretty serious scratches in the tiles as well. In between each coat of Ardex, I used 80 grit on a sanding block to smooth out any rough areas before adding the next layer. On the final coat, I used 120 and 220 grit on a random orbital sander to get a really smooth finish.
Tools - I used a concrete/grout/thinset mixing paddle that attaches to a drill to mix up each batch of Ardex. A 10" taping knife was my favorite tool, for spreading over the countertop. I also used a 2" metal putty knife for cleaning up the edges and getting into small spaces. Plastic sheeting and blue painters' tape saved my lower cabinets and floors. You'll definitely want a vacuum/shopvac to clean up all the concrete dust. Rags for applying the sealers, and a disposable bowl or something to pour it into.
Protective gear - Safety glasses and dust masks, especially during sanding, and nitrile gloves while applying the concrete are a must.
**Cement Color - I used a mix-in powder that was fine. It was all I could find locally and had already started the project when I decided I wanted to color the counters darker. I did notice a few places where it looks like maybe the color wasn't blended as well. This makes me wonder if a liquid colorant like this one would have worked better. Oh well. I like the way mine turned out, but this may have worked better.
After I read everything I could find, and called the company with a handful of questions, I decided to just jump in and do it. I ordered the Ardex Feather Finish and the Sealers, had my husband take out the sink and appliances, ripped off the huge (2" thick!) piece of trim that was acting as a backsplash on the existing countertops. And then everything came to a screeching halt. It seems that whoever installed the tile countertop did a not-so-great-job and left a gap of about 1 1/2 inches along the wall! A little gap is ok - necessary even, but it should be small enough to cover with a bead of calking. This was just ridiculous! Hubby decided to fix this by ripping out a row of tile (SO glad we didn't do this everywhere!!!) and nailing in a strip of plywood. We covered all the joints with drywall tape and a thin coat of Ardex and now we'll just have to hope that's enough! :)


I started with a ratio of 1 Tbsp of the cement color to 2 Cups of Ardex. My husband was concerned with how dark it was, and knowing it would get even darker with the sealer, I lightened it up a shade with a 1:3 ratio instead. (I still think I would've liked it darker, but it's beautiful as is.) With the slightly lighter first coat, I used a little bit of the Ardex on a separate piece of leftover tile (you could do it on scrap wood or maybe even cardboard too!) Then once it was dry, I tested the sealers on it, just to make sure I was happy with the finished color.
 |
| Raw Ardex on the left, Two coats of Satin Seal in the middle, Two coats of Final Coat over the Satin Seal on the right |
The people at Ardex recommend you add your water to the bucket first, and then mix in the concrete, using a 2:1 ratio of Ardex to water. I started by mixing the color powder into the water, and then mixing in the concrete. If it felt too stiff, I added 1/4 - 1/2 cup water more, but that's it. You have to work quickly, since this is really only workable for 15-20 minutes once it's mixed.
After mixing, I dumped it out in globs across the countertop and started spreading. The first coat was really thin - it mostly just filled in all the grout lines and added a barely-there coat to the tiles. Then I went to bed.


Before starting the second coat, I used a sanding block with 80 grit sandpaper and went over some of the trowel lines to smooth things out. I did this by hand because I felt I had more control. I wasn't trying to make it perfect, just smooth down any really noticeable bumps. I followed the sanding with a very thorough vacuuming (using the brush attachment on my shopvac). Then I added the next coat. I put this one on a little thicker. The first was just to fill the grout lines, while this was meant to cover everything. Then I went to bed. :)

I followed the same procedure with the third and fourth coats, sanding by hand with 80 grit before applying the layer of Ardex. My husband was home and able to keep the boys out of the kitchen for the day, so I was able to get the final two coats on in one day - one in the morning, and the other later in the evening. If I'd had the energy (or extra hands in the kitchen) I'm sure we could have managed to do three coats in a day, but by the time I'd finished one coat on three different countertops I was ready for a nap! (Pregnancy will do that to you!)
I let the fourth coat dry for maybe a day and a half before sanding it. This time I used the random orbital sander with 120 grit over the whole counter. I lightly went over the flat part of the sides of the counters with it as well, being very careful not to go too hard on the edges and corners (I did these by hand). Then I went over everything again with 220 grit. I also attached the hose on the shopvac to the sander and that kept things significantly cleaner.
This left it super smooth and actually brought out the variations in the color. I vacuumed everything again and made sure there was no dust or anything to get in the way, and got ready to start the sealers. This was pretty easy, all things considered. You'll definitely want to wear gloves, as it'll probably get all over your hands if you don't. I used a cloth rag to apply both sealers (the products give you a short list of good applicators). I did 2 coats of Satin Seal, followed by 4 coats of Final Coat. The Satin Seal darkened up the concrete, while the Final Coat just made it really shiny, so keep that in mind if you're trying to get a specific color.

Some of the color variation and trowel marks left in the finished counter.


Overall, I absolutely love my countertops! They're so smooth and I love the subtle variations in color! We've had them for about 2 months now and they've held up quite well so far. I really can't say as to long-term durability yet, but based on the reviews on a number of other blogs, I'm guessing they've got a few years in them at least. It took a little longer than I'd hoped, but that's the way these things always go right? (and kids definitely limited my work time...)
I have noticed a few little cuts and scratches (mostly around the sink area where I set dishes to dry) where the concrete gets darker when there's water on it. While it makes me think that maybe I should put on another coat of the Satin Seal, it hasn't really been too big of an issue. I have a little jar of Satin Seal under the sink and I just use a cotton swab to touch up that one little spot. (Maybe do a third coat of the Satin Seal before using the Final Coat.
Would I recommend it? Definitely, but do your research first. And maybe don't do it in January - opening up the windows is not so fun... :) (Check out these blog posts as well! Sarah gives great info here, here, and here. Taryn has some great tips as well here. John & Sherry did another one here.)
I'm the type of person that wants specific details and was frustrated that I wasn't seeing real numbers for what people were using when I was researching this for myself. For those of you like me, see below. I've included the dimensions of my countertops as well as exactly how much Ardex/water/color I used.

How much did I use?
Buffet - 1st Coat: 2 c Ardex + 1 c Water + 2 tsp Concrete Color
2nd Coat: 4 c Ardex + 2 c Water + 1 Tbsp 1 tsp Concrete Color
3rd Coat: 4 c Ardex + 2 c Water + 1 Tbsp 1 tsp Concrete Color
4th Coat: 4 c Ardex + 2 c Water + 1 Tbsp 1 tsp Concrete Color
Counter 1 - 1st Coat: 4 c Ardex + 2 c Water + 1 Tbsp 1 tsp Concrete Color
2nd Coat: 6 c Ardex + 3 c Water + 2 Tbsp Concrete Color
3rd Coat: 6 c Ardex + 3 c Water + 2 Tbsp Concrete Color
4th Coat: 8 c Ardex + 4 c Water + 2 Tbsp 2 tsp Concrete Color
Counter 2 - *1st Coat: 4 c Ardex + 2 c Water + 1 Tbsp 1 tsp Concrete Color (x2)*
2nd Coat: 12 c Ardex + 6 c Water + 4 Tbsp Concrete Color
3rd Coat: 12 c Ardex + 6 c Water + 4 Tbsp Concrete Color
4th Coat: 14 c Ardex + 7 c Water + 4 Tbsp 2 tsp Concrete Color
*I divided Counter 2 in two parts for the first coat to make it easier. The following coats I did in one go with my husband doing one half while I did the other. This made sure the color was uniform across the counter, rather than potentially having a line down the middle.*
A special thanks to Alli Judd for taking these amazing pictures!


![Facebook_F[1]](http://farm8.staticflickr.com/7175/6426658719_cd31bb8b47_s.jpg)


0 comments